
At the back of my house was this broken down old shed. My neighbour who had lived next door for many years before we moved in said it had been there for years and years.
It wasn't a bad size as in it was about 12 foot long by 10 foot wide but the roof was sagging, it was damp, full of spiders and going in there wasn't a pleasant experience! The door in was hanging by one hinge too. It did have a concrete floor though which was a bonus.
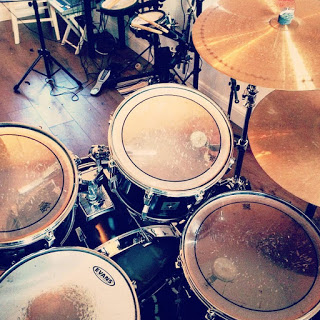
It was time to demolish it and put something new up. A year later I have new drum studio that is a fantastic space and I feel very lucky to have it every time I walk in there. I have my acoustic and electronic kits permanently set up and switch between the two depending on if I am practising or recording.
This then is the story of the build of the drum studio, the materials I used in the construction and in part 2 how I fitted out with recording equipment on a low budget.
As I have discovered you can get great results without having to spend huge money on expensive microphones and interfaces. But more on that in part 2.
The first mission was to demolish the old shed and clear all the debris away to the local tip. My plan was to extend the concrete base in width and length so that would end up with a decent size room. In the UK planning regulations have been relaxed so that if you keep to a certain size and height you don't need planning permission for an outbuilding.
I created shutters for the concrete from second hand timber and mixed concrete in a wheel barrow from sand and cement from the building suppliers. That was hard work! Even just lugging the bags of sand and cement was majorly back breaking, never mind mixing the concrete. The other thing that got me was the realisation that a full wheel barrow mix hardly filled the space. So I went and hired a mixer from the building depot. That made the mixing a lot easier although lugging the bags was the same hard graft. Why does the material come in such heavy sizes? The concrete work was over a good few weekends. If you are taking this on I would recommend getting some help.
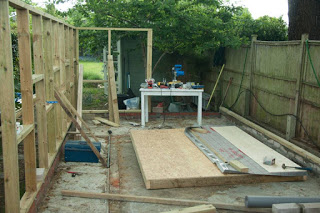
Next I cemented bricks two high all the way round. My thinking was that in the rain the bricks would get wet at the base rather than the base timbers. I am no brickie for sure but I got the job done and that let me start to build the walls. I used 4 by 2 treated timbers for the outer frame so that later I could fill the cavity with 100mm rock wool.
For the outer skin I used OSB board and then a breathable waterproof membrane and then finished with tongue and groove pine. The tongue and groove pine is the interior cladding stuff from B&Q. The exterior cladding is twice the price so I figured, use the interior type, and paint it as soon as it is fitted to protect it from the weather. Once I got the outer walls up I used polythene and tarpaulins to keep the rain off.
For the roof I thought long and hard about the best way to construct it. I considered trusses. Buying them was right out of my budget and making them looked like too much effort and skill to get right. I didn't want to have any kind of post or pillar in the room so I settled on a long central beam. It was an eight by two and only cost about £20.
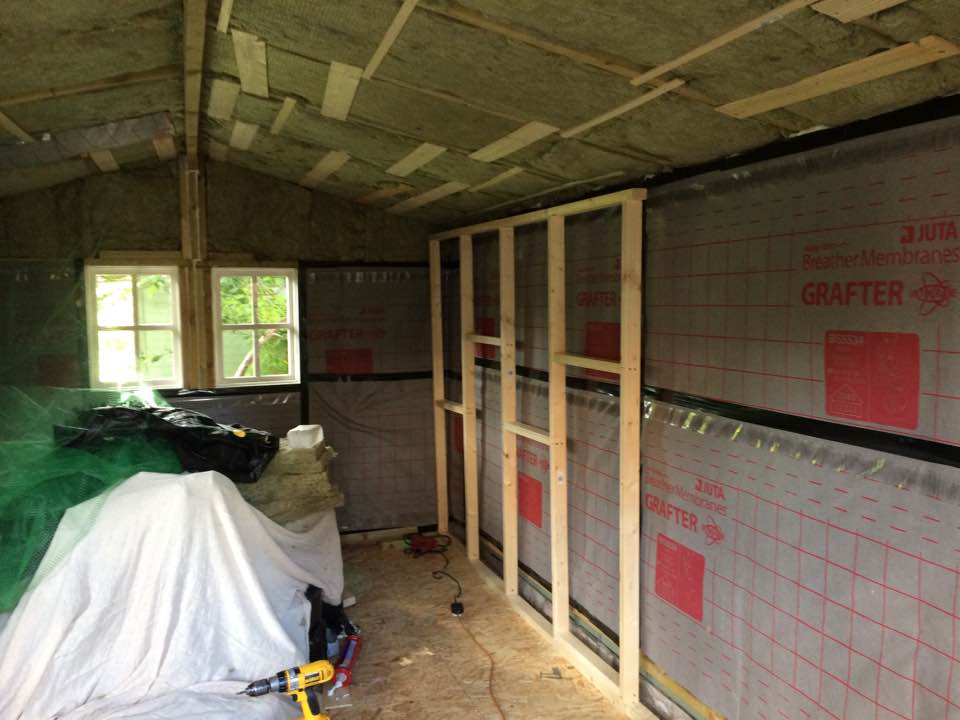
For the windows I found a website called windows4sheds. I went with six windows to get maximum light in to the space. The idea was to have windows that looked like standard shed windows.
For the roof sheets I used more OSB board and then roof felt. Any kind of roof tiles, slates or shingles were way out of my budget.

Once I had the exterior wind and watertight with the roof and door on and the windows in I started to line the interior of the outer wall with 100mm thick rock wool slab. The great thing about rock wool is you can cut it with a standard saw. Horrible stuff to work with though! A decent particle mask and goggles are essential. Expensive stuff too. The rock wool in total was very pricey and added a lot to the cost of the build.
With sound proofing in mind I used rock wool slab again under a floating floor that I made using the same OSB board as I used for the roof. In fact I had some boards left over from the roof construction. I then got to work on creating an inner room within a room. This time using timber that would let me insert a 50mm rock wool slab. I left a gap of about 25mm between the two walls. So all in all the walls to the studio are over 200mm thick. Good sound proofing is all about mass I found out (before I started all this!).
I got a bit of help from my mate who is a carpenter (thanks Dave) with the interior walls, the internal door and the gyproc (drywall) work which helped move the project on a lot faster at this point. The plasterboard sheets on the ceiling I could never have managed on my own.
Back to the windows and of course a standard shed window wouldn't give any kind of soundproofing, so I ordered laminated glass to triple glaze each window. As I write this I can't remember the thickness of the glass but it was at least 8mm. That was another expensive purchase.
From the outside my drum studio looks like any standard garden building so it's in keeping with my other little garden summer house style shed and the garden generally. Result!
I filled and sanded the plasterboard seams and then painted the whole interior white. I then put down an oak effect laminate 'click-together' floor and then a skirting board. I brought in our old kitchen sofa and made a desk from two scaffold boards and metal desk legs from Amazon.
I worked as an electrician for a few years so installing the power outlets and lighting was fairly straightforward.

But what about the level of sound proofing you might be wondering. For sure it isn't completely sound proof and I am not sure that was even possible for a self build using standard building materials. There are specialist fixings on the market which I knew about that you can hang your plasterboard on called Genie Clips that I couldn't afford and the more expensive acoustic plaster board I decided against.
From the outside, with a friend playing the kit, up close to the building the kit is audible. At the rear I can walk about 10 metres and the sound has dropped away and is inaudible. Walking away from the front, the sound doesn't drop off as well though. At 15 metres I can still hear the kit. That is down to the doors and at the moment I am not sure what I can do about that. Having said all that though I can play the kit without annoying the neighbours. I haven't had any complaints.
I tend to practise on the electronic kit anyway and play the acoustic kit more when recording.
I bought a Roland V-Drums TDK3 kit a good while back and around the same time as getting the studio ready upgraded this kit by buying 3 mesh head tom triggers to replace the old rubber ones that came with the kit.
A real bonus is being able to record my band. Not all at once of course as we would struggle to all fit in but getting band members in two at a time to record guitars, keyboards, bass and vocals is now a regular thing.
I am also mixing tracks that we recorded as a band elsewhere and another bonus is I can collaborate with other artists by laying down drum recordings for their tracks, which I have just started doing. (more on that in the near future).
As I look back now, I know for sure that I saved a huge amount of money by building and fitting out the studio myself. A ready made garden structure of this size (before acoustic treatments) is easily £10k.
I also have a great sense of achievement and of course having a practise space means I can play every day. Something I have not been able to do since I was a teenager playing my old Olympic kit in my bedroom after school when my mum was out at work!
Being able to record and mix is the icing on the cake though. More on that in part 2. Thanks for reading.